控件插件开发
本文档将详细介绍前端控件如何进行二次开发,并辅以样例进行说明;适合无任何V平台前端控件二次开发经验的开发人员进行阅读。本文将以文本框为例,详细阐述整个开发过程。
开发流程
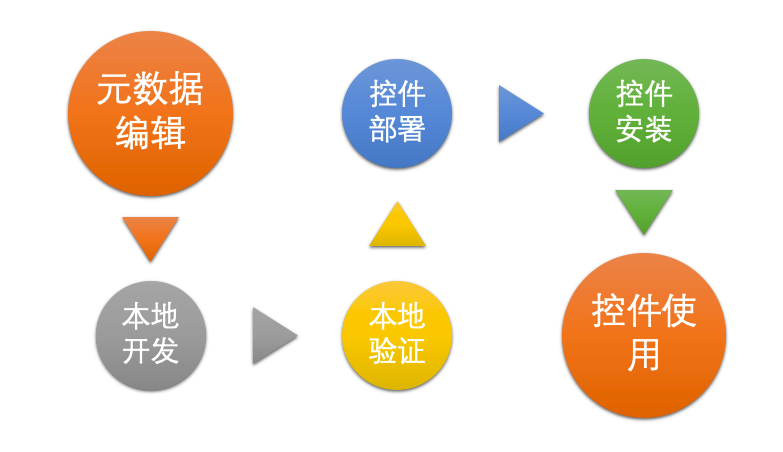
在进行前端控件二次开发之前,首先需要了解前端控件二次开发的开发流程,以便于在整体轮廓上理解二次开发流程。如下图:

控件开发流程
元数据编辑
在二次开发控件前,首先需要明确当前控件需求,确定当前控件名称、属性及事件等信息。当以上信息固化下来后,控件元信息已经完成,以下为元数据详细描述,其内容格式:
{
    groupId:"com.yindangu.widget",//组织id
    code:"JGDevTextBox",
    plugins:[{
            "type": "widget",
            "icon": "./JGDevTextBox.png",
            "code": "JGDevTextBox",
            "name": "二次开发文本",
            "desc": "简单的二次开发文本控件",
            "defineUrl": "./JGDevTextBox.js",
            "visible": true,
            "properties": [{
                    "code": "Alias",
                    "name": "标题",
                    "desc": "文本中显示的标题",
                    "default": "按钮",
                    "type": "char",
                    "editor": {
                        "type": "char",
                        "placeholder": "请输入标题"
                    },
                    "access": {
                        "rule": {
                            "readable": true,
                            "writable": true
                        },
                        "webDesigner": {
                            "readable": true,
                            "writable": true
                        }
                    }
                }, {
                    "code": "Top",
                    "name": "上边距",
                    "desc": "上边距",
                    "type": "integer",
                    "default": 0,
                    "editor": {
                        "type": "top"
                    }
                }, {
                    "code": "Left",
                    "name": "左边距",
                    "desc": "左边距",
                    "type": "integer",
                    "default": 0,
                    "editor": {
                        "type": "left"
                    }
                }, {
                    "code": "MultiWidth",
                    "name": "宽度",
                    "desc": "宽度",
                    "type": "integer",
                    "default": 50,
                    "editor": {
                        "type": "width"
                    }
                }, {
                    "code": "MultiHeight",
                    "name": "高度",
                    "desc": "高度",
                    "default": 50,
                    "type": "integer",
                    "editor": {
                        "type": "height"
                    }
                },{
                    "code": "datasource",
                    "name": "数据源",
                    "desc": "绑定数据源",
                    "default": null,
                    "type": "char",
                    "editor": {
                        "type": "entity"
                    }
                },{
                    "code": "fieldCode",
                    "name": "字段",
                    "desc": "绑定的数据源字段",
                    "default": null,
                    "type": "char",
                    "editor": {
                        "type": "field",
                        "entityProp":"datasource"
                    }
                },{
                    "code": "TitleWidth",
                    "name": "标题宽度",
                    "desc": "标题宽度",
                    "default": 76,
                    "type": "integer",
                    "editor": {
                        "type": "integer",
                        "min":0
                    }
                }, {
                    "code": "OnLabelClick",
                    "name": "标题点击事件",
                    "type": "funtion",
                    "desc": "点击标题时触发",
                    "editor": {
                        "type": "ruleset"
                    }
                }, {
                    "code": "OnKeyDown",
                    "name": "键盘按下事件",
                    "type": "funtion",
                    "desc": "键盘按下时触发",
                    "editor": {
                        "type": "ruleset"
                    }
                }, {
                    "code": "OnLeave",
                    "name": "焦点离开事件",
                    "type": "funtion",
                    "desc": "焦点离开时触发",
                    "editor": {
                        "type": "ruleset"
                    }
                }, {
                    "code": "Disabled",
                    "name": "禁用",
                    "type": "boolean",
                    "desc": "禁用控件",
                    "editor": {
                        "type": "boolean"
                    },
                    "access": {
                        "rule": {
                            "readable": true,
                            "writable": true
                        },
                        "webDesigner": {
                            "readable": true,
                            "writable": true
                        }
                    }
                }
            ]
    }]
}
元数据文件名称固定为manifest.json,其中各部分定义如下
plugins定义
定义控件基本信息,详情如下:
| 编码 | 类型 | 必填 | 默认值 | 描述 |
|---|---|---|---|---|
| type | Enum | 是 | 插件类型,控件为widget | |
| icon | String | 是 | 控件图标 | |
| code | String | 是 | 控件编码,应全局保持唯一 | |
| name | String | 是 | 控件名称,应简要明确说明用途 | |
| scope | String | 否 | smartclient | 控件应用范围,可用枚举值:smartclient |
| catalog | String | 否 | businessComponent | 控件分类,枚举值:generalComponent(通用控件)、fieldComponent(字段控件)、businessComponent(业务控件) |
| desc | String | 否 | 控件描述,详细描述控件用途 | |
| author | String | 否 | 控件开发者 | |
| visible | Boolean | 否 | true | 是否在窗体设计器中显示 |
| defineUrl | String | 否 | ./define.js | 控件定义脚本文件url |
| debugUrl | String | 否 | ./debug.js | 控件调试脚本文件url |
| designerDefineUrl | String | 否 | ./designerDefine.js | 设计器定义脚本文件url |
properties属性
properties属性值为数据组,方便属性在编辑器中显示时进行排序,首先根据属性分类信息进行分组,组内再按照数组中的位置进行排序。其中属性分类信息优先使用属性catalog值,如未设置,则使用编辑器中的分类信息。该属性为可选属性,如未设置,则代表控件无任何属性;properties属性值中每一个数组元素定义一个控件属性,其中控件属性包括以下信息:
定义属性编号,名称,描述及默认值信息;该属性为必填属性,详情如下:
| 编码 | 类型 | 必填 | 默认值 | 描述 |
|---|---|---|---|---|
| code | String | 是 | 控件属性编码,在控件中应保持唯一 | |
| name | String | 是 | 控件属性名称,应简要明确说明属性用途 | |
| type | String | 是 | 控件属性类型 | |
| catalog | String | 否 | 控件属性分类,枚举值:Event(事件)、Layout(格式)、Data(数据)、Other(其他) | |
| desc | String | 否 | 控件属性描述,详细描述控件属性用途 | |
| default | Any | 否 | null | 控件属性默认值 |
| editor | Object | 否 | 编辑器信息 | |
| compatible | Object | 否 | 兼容配置,旧平台控件未使用该二次开发规范开发,需要有些兼容配置,新控件无需关注此配置。 |
编辑器定义信息(editor)
编辑器信息,描述当前属性使用何种编辑器及编辑器元信息;该属性为可选属性,如未设置,则使用文本编辑器编辑;详细参考属性编辑器定义;
访问信息(access)
定义属性访问权限,该属性为可选属性,如不存在,则代表其属性都采用默认值,其中:
设计器(designer)
详细描述设计器中该属性的访问权限信息,详情如下: | 编码 | 类型 | 默认值 | 描述 | | ------- | ------- | ------ | ------------------------------------------------------------ | | visible | Boolean | true | 是否在设计器中显示,控件可能定义私有属性,不需要在设计器中显示 |
注意:如该属性设置在规则中可访问,应提供get、set方法;例:获取、设置标题属性(title),控件应提供setTitle和getTitle实例方法。
规则(rule) 详细描述规则中该属性的访问权限信息,详情如下:
| 编码 | 类型 | 默认值 | 描述 |
|---|---|---|---|
| readable | Boolean | true | 描述该属性是否能在规则中读取 |
| writable | Boolean | true | 描述该属性是否能在规则中编辑 |
web设计器(webDesigner)
详细描述web设计器中该属性的访问权限信息(tips:如设计器完全web化后,此配置应与designer合并)。详情如下: | 编码 | 类型 | 必填 | 默认值 | 描述 | | -------- | ------- | ---- | ------ | --------------------------------- | | readable | Boolean | | true | 描述该属性是否能在web设计器中读取 | | writable | Boolean | | true | 描述该属性是否能在web设计器中编辑 |
本地开发
目前平台控件是基于smartclient UI框架进行封装的,因此控件二次需要先了解smartclient相关知识,以下提供smartclient官方文档:
在了解smartclient相关知识后,就可以按照smartclient扩展规范扩展控件,平台完成对接smartclient数据源,开发人员无需学习平台任何其他控件规范信息,控件定义脚本如下:
isc.ClassFactory.defineClass("JGDevTextBox", "DynamicForm");
isc.JGDevTextBox.addProperties({
    //文本标题
    Alias: "文本",
    //文本高度
    MultiHeight: 30,
    //文本宽度
    MultiWidth: 235,
    //左边距
    Left : 50,
    //绑定数据源
    datasource:null,
    //绑定字段
    fieldCode:null,
    //标题宽度
    TitleWidth:76,
    //上边距
    Top : 50,
    //标题点击事件
    OnLabelClick: null,
    //键盘按下事件
    OnKeyDown: null,
    //焦点离开事件
    OnLeave: null
});
isc.JGDevTextBox.addMethods({
    init: function () {
        this.titleWidth = this.TitleWidth;
        this.left = this.Left;
        this.top = this.Top;
        this.width = this.MultiWidth;
        this.height = this.MultiHeight;
        this.enabled = !this.Disabled;
        this.valuesManager = isc.ValuesManager.getByDatasource(this.datasource);
        this.items = [{
            width:"*",
            title : this.Alias,
            type : "text",
            name : this.fieldCode,
            titleClick : this.OnLabelClick,
            blur : this.handleBlur
        }];
        return this.Super("init", arguments);
    },
    handleBlur : function(){
        //焦点离开后同步文本框的数据到数据源
        this.form.valuesManager.saveData();
        if(this.OnLeave){
            //触发焦点离开事件
            this.OnLeave();
        }
    }
});
本地验证
<!DOCTYPE html>
<html lang="en">
<head>
    <meta charset="UTF-8">
    <meta http-equiv="X-UA-Compatible" content="IE=edge">
    <meta name="viewport" content="width=device-width, initial-scale=1.0">
    <title>控件测试页面</title>
    <script src="http://localhost:8080/module-operation!executeOperation?operation=vds-sdk-js"></script>
    <script>
        vds.config({
            debug: true,
            import : "vds.mock.*"
        }).ready(function () {
            vds.mock.init("./manifest.json").then(function (mock) {
                mock.get("JGDevTextBox").then(function (widgetMock) {
                    widgetMock.exec(function(properties){
                        var widget = isc.JGDevTextBox.create(properties);
                        widget.show();
                    });
                }).catch(function (error) {
                    console.error(error.message);
                    throw error;
                });;
            }).catch(function (error) {
                console.error(error.message);
                throw error;
            });;
        });
    </script>
</head>
<body>

</body>
</html>
其中http://localhost:8080为V平台应用服务地址。
控件部署
控件部署前,需要将元数据manifest.json文件及控件定义js文件打包成zip,其中manifest.json文件需放置在根目录下,其他文件可以自定义目录,在元数据中填入相对路径即可。
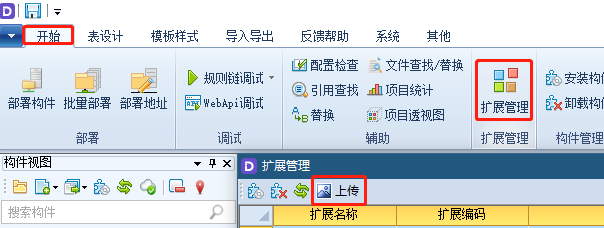
此时控件二次开发工作已完成,进入开发系统(开发系统使用参考这里),在开始-》扩展管理-》上传中,选择控件压缩包即可,如下图:

控件安装
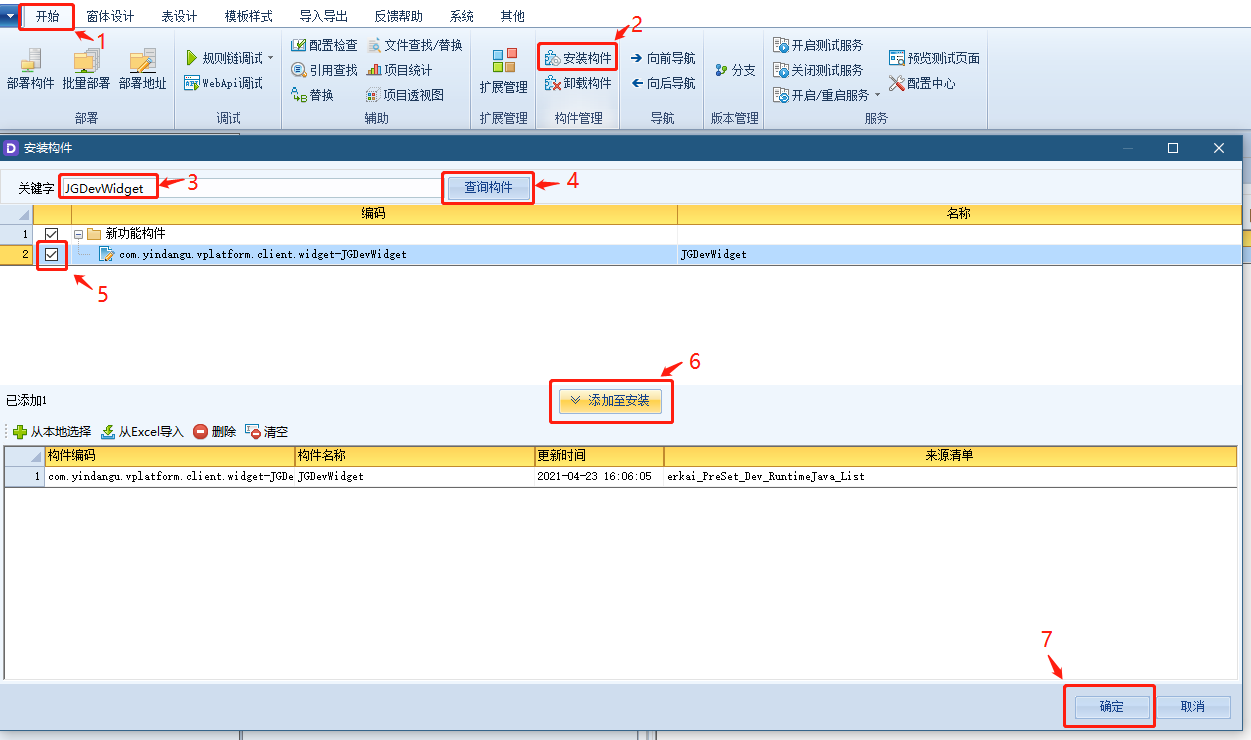
控件部署完毕后,控件已提交到平台仓库受控,开发系统中还未安装该控件,此时需要使用开发系统中开始-》安装构件-》搜索(搜索值为插件编号)-》安装,如下图:

控件安装
待提示构件安装成功后,控件安装完成。
控件使用
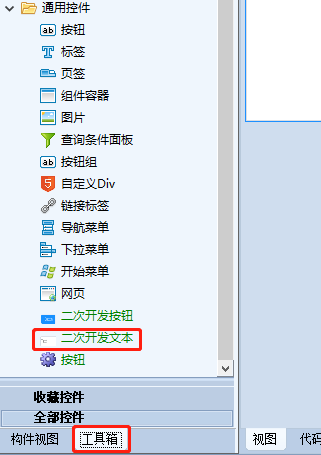
待开发系统安装完成后,二次开发控件的使用方法与平台内部提供的控件一样,在普通窗体中拖拽出来使用,如下图:

注意事项
目前暂不支持容器类型控件二次开发
目前暂不支持平台控件扩展二次开发